Follow Me On Social Media!
Raspberry Bars with Oatmeal Crumble Topping: A Bright and Buttery Classic.
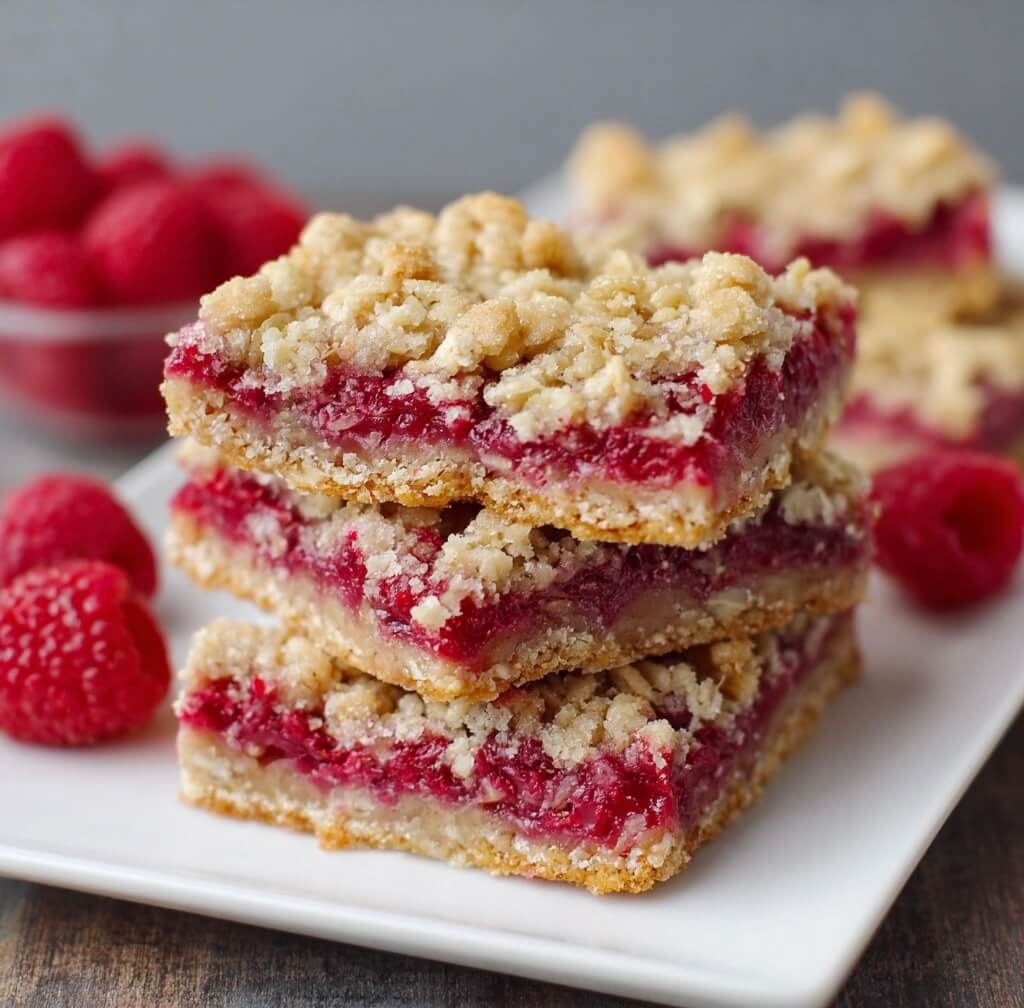
There is a timeless appeal to a dessert that balances a jammy, tart fruit center with a salty, toasted oat crust. These Raspberry Bars are a staple in my kitchen because they manage to be both rustic and refined. Unlike a complex pie that requires a perfect lattice, these bars embrace the “crumble” aesthetic—using one versatile dough for both the buttery base and the golden topping.
I find these are the perfect solution for a mid-afternoon snack or a casual outdoor gathering. They travel well, they don’t require a fork, and the acidity of the raspberries ensures the sweetness never becomes overwhelming. It’s a reliable, one-pan recipe that fills the house with the scent of toasted butter and warm sugar, making it a favorite for both the baker and the lucky people who get to eat them.
Ingredients
The Oat Dough (Base and Topping)
- 1.5 Cups All-Purpose Flour: Sifted for a consistent crumb.
- 1.5 Cups Old-Fashioned Rolled Oats: These provide a much better “bite” and texture than quick oats.
- 1 Cup Light Brown Sugar: Packed. The molasses in the brown sugar gives the crust a deep, toffee-like flavor.
- 1/2 Teaspoon Baking Soda.
- 1/4 Teaspoon Fine Sea Salt.
- 3/4 Cup Unsalted Butter: Melted and slightly cooled.
The Raspberry Center
- 10 oz High-Quality Raspberry Preserves: Look for a brand with seeds for a more authentic texture.
- 1 Cup Fresh Raspberries: To add a layer of brightness and real fruit acidity.
- 1 Tablespoon Fresh Lemon Juice: To sharpen the fruit flavor.
- 1 Teaspoon Cornstarch: To help the fresh berries set so the bars aren’t too messy.
Instructions
1. Prep the Pan
Preheat your oven to 350°F (175°C). Grease an 8×8-inch square baking pan and line it with parchment paper, leaving a slight overhang on the sides. This “sling” will allow you to lift the entire block of bars out easily once they have cooled, ensuring clean, sharp cuts.
2. Mix the Crumble
In a large bowl, whisk together the flour, rolled oats, brown sugar, baking soda, and salt. Pour in the melted butter and stir with a fork until the mixture is crumbly and no dry flour remains. The texture should resemble wet sand that clumps together when squeezed.
3. Press the Base
Take about two-thirds of the oat mixture and press it firmly and evenly into the bottom of your prepared pan. Use the bottom of a flat measuring cup to really pack it down; a tight base prevents the raspberry filling from seeping through and making the bottom soggy.
4. Prepare the Filling
In a small bowl, gently toss the fresh raspberries with the lemon juice and cornstarch until coated. Stir in the raspberry preserves. By mixing fresh fruit with preserves, you get a “best of both worlds” filling—the structural stability of the jam and the vibrant, tart pop of the whole berries.
5. Layer and Top
Spread the raspberry mixture evenly over the pressed oat base. Take the remaining one-third of the crumble mixture and sprinkle it over the top. I like to leave some larger clumps of crumble to create variety in the topping.
6. Bake to Golden
Bake for 30 to 35 minutes. You are looking for the edges of the fruit to be bubbling and the oat topping to be a deep, toasted golden brown.
7. The Patience Phase
This is the most important step: let the bars cool completely in the pan. If you try to cut them while they are warm, the raspberry center will be too fluid and the bars will fall apart. For the cleanest slices, refrigerate the pan for an hour before lifting the parchment sling and cutting into squares.
Flavor & Texture Notes
These bars are defined by the crunch and chew of the oats against the velvety smoothness of the raspberry filling. The brown sugar in the crust caramelizes against the butter, creating a flavor that is reminiscent of a high-end oatmeal cookie.
The raspberries provide a sharp, clean acidity that cuts right through the richness of the butter. Because we added fresh berries and lemon juice, the center isn’t just sweet—it’s bright and complex, with a beautiful ruby-red color that looks stunning when sliced.
Tips & Variations
- The Almond Twist: Add 1/2 cup of sliced almonds to the crumble topping for an extra layer of crunch and a nutty aroma.
- Other Fruits: This technique works perfectly with blackberry, apricot, or even blueberry preserves.
- Whole Wheat: You can replace half of the all-purpose flour with whole wheat flour for a heartier, more “breakfast-style” bar.
- Citrus Zest: Add the zest of an entire lemon to the oat mixture to amplify the brightness of the fruit.
Storage & Make-Ahead
- Room Temperature: Store the bars in an airtight container for up to 3 days.
- Refrigeration: These bars actually taste incredible when cold. They will stay fresh in the fridge for up to 1 week.
- Freezing: These are excellent for freezing. Wrap individual bars in plastic wrap and store them in a freezer bag for up to 3 months. You can eat them straight from the freezer for a chewy, cold treat!
Serving Suggestions
For a casual snack, these are perfect exactly as they are. However, if you want to turn them into a plated dessert, serve a warm bar with a scoop of high-quality vanilla bean ice cream. The cold cream melting into the warm raspberry and butter is a classic combination. They also pair beautifully with a cup of Earl Grey tea, as the bergamot in the tea complements the floral notes of the raspberries.
FAQ
Can I use quick oats instead of old-fashioned?
You can, but the texture will be much softer and less “craggy.” Old-fashioned oats provide the structural integrity that makes these bars so satisfying to bite into.
Why is my filling runny?
This usually happens if the lemon juice was skipped or if the bars weren’t allowed to cool completely. The cornstarch needs that cooling period to fully set the fruit juices.
Do I have to use fresh berries?
No, you can use just preserves if that’s what you have on hand. The bars will be slightly sweeter and less tart, but still delicious. If you use only jam, you can skip the cornstarch.
Conclusion
Raspberry Bars with Oatmeal Crumble are a testament to the fact that the best desserts are often the simplest. By using a few pantry staples and focusing on the balance of salt, fat, and fruit, you create a treat that is consistently rewarding. It’s a recipe that invites you to be messy with the crumble and patient with the cooling, resulting in a bar that feels like a true homemade classic. Give them a try the next time you have a jar of jam and an hour to spare—they are sure to become a permanent fixture in your baking repertoire.