Follow Me On Social Media!
Marbled Brownie Cheesecake Bars.
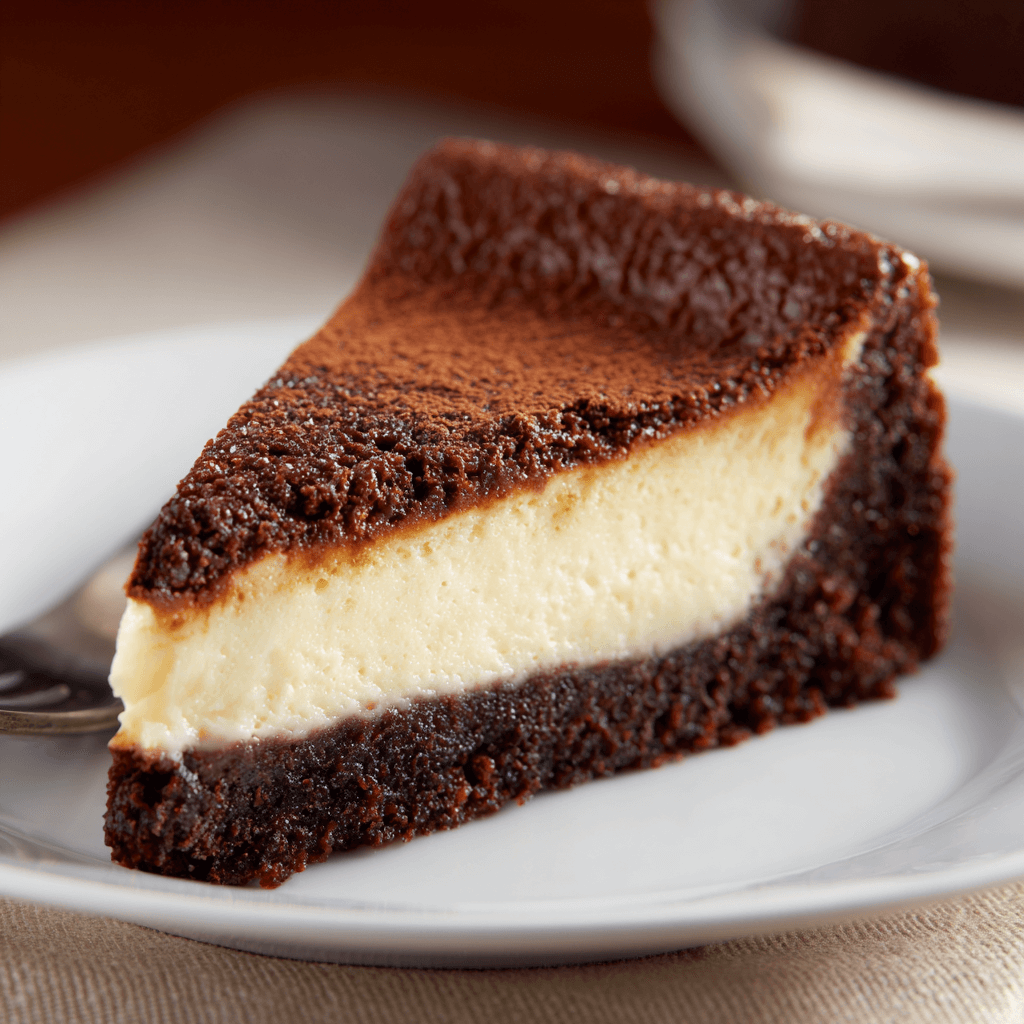
There is an ongoing debate in the dessert world: do you want the dense, chocolatey bite of a fudge brownie, or the silky, tangy elegance of a baked cheesecake? This Brownie Cheesecake recipe ends that conflict by marrying the two into a single, marbled masterpiece. It is a striking dessert that looks far more complicated than it actually is, making it a perfect candidate for potlucks, birthdays, or a quiet Sunday afternoon project.
The secret to this recipe is the temperature and the timing. By using a “from-scratch” brownie base rather than a box mix, we ensure the chocolate layer is sturdy enough to support the weight of the cheesecake without becoming soggy. The result is a bar that offers a sophisticated play on textures—a chewy, cocoa-rich foundation topped with a cloud-like swirl of sweetened cream cheese.
Ingredients
To get that distinct “zebra” swirl, you need a high-quality cocoa powder and full-fat cream cheese. Low-fat versions tend to release too much moisture, which can ruin the brownie’s fudgy integrity.
For the Brownie Base
- Unsalted Butter: 3/4 cup, melted and slightly cooled.
- Granulated Sugar: 1 cup.
- Large Eggs: 2, at room temperature.
- Vanilla Extract: 2 teaspoons.
- Unsweetened Cocoa Powder: 2/3 cup, sifted.
- All-Purpose Flour: 1/2 cup.1
- Fine Sea Salt: 1/4 teaspoon.
For the Cheesecake Swirl
- Cream Cheese: 8 oz (one block), softened completely to room temperature.2
- Granulated Sugar: 1/4 cup.
- Large Egg: 1, room temperature.
- Vanilla Extract: 1/2 teaspoon.
Instructions
Prepare the Pan and Oven
Preheat your oven to 350°F. Line an 8×8-inch square baking pan with parchment paper, leaving an inch of overhang on the sides. This “sling” is essential for lifting the bars out cleanly once they’ve set. Lightly grease the parchment with a bit of butter or non-stick spray.
Mix the Brownie Batter
In a medium bowl, whisk together the melted butter and the 1 cup of sugar until the mixture looks glossy. Add the two eggs and two teaspoons of vanilla, whisking until smooth. Gently fold in the sifted cocoa powder, flour, and salt with a rubber spatula. Mix just until no dry streaks remain. Set aside about 1/2 cup of this batter—you’ll need it later for the marbling. Pour the rest of the brownie batter into the prepared pan and smooth it into an even layer.
Prepare the Cheesecake Topping
In a separate bowl, beat the softened cream cheese and 1/4 cup of sugar together until light and fluffy. You can use a hand mixer or a sturdy whisk. Add the remaining egg and 1/2 teaspoon of vanilla, mixing on low speed until the batter is just combined. Be careful not to over-beat at this stage, as too much air can cause the cheesecake layer to puff up and then crack.
Create the Swirl
Spoon the cheesecake mixture over the brownie batter in the pan. Take that reserved 1/2 cup of brownie batter and drop small dollops on top of the cheesecake layer. Using a butter knife or a skewer, gently drag the tip through the dollops to create a marbled, swirled effect. Don’t over-swirl, or the colors will muddy together; three or four long “S” shapes across the pan are usually enough.
Bake and Set
Bake for 25 to 30 minutes. You are looking for the edges to be set and the cheesecake center to have just a slight, firm jiggle. Avoid over-baking, as the brownie will lose its fudgy texture. Let the pan cool completely on a wire rack at room temperature for an hour, then refrigerate for at least 3 hours (or overnight). Cold bars are much easier to slice into clean, sharp squares.
Flavor and Texture Notes
The first thing you’ll notice is the contrast in sweetness. The brownie base is deep, dark, and almost bitter from the cocoa, which is the perfect foil for the bright, tangy, and sweet cheesecake topping.
The texture is a delight—the brownie is dense and chewy at the edges, while the cheesecake layer adds a velvety, melt-in-the-mouth quality. Because the two batters have different densities, you get a “layered” mouthfeel that is far more interesting than a standard chocolate cake.
Tips and Variations
- The Slicing Secret: For professional-looking squares, use a large chef’s knife and dip it in hot water, then wipe it dry between every single cut. This prevents the cheesecake from smearing onto the dark brownie layers.
- Fruit Addition: Drop a few fresh raspberries into the cheesecake batter before swirling. The tartness of the berries pairs beautifully with both the cheese and the chocolate.
- Espresso Boost: Add a teaspoon of espresso powder to the brownie batter. It won’t make the bars taste like coffee; instead, it intensifies the natural flavor of the cocoa.
- Gluten-Free Swap: You can easily swap the 1/2 cup of all-purpose flour for a 1:1 gluten-free flour blend. Since there is so little flour in this recipe, the texture remains almost identical.
Storage and Make-Ahead
Because of the cream cheese, these bars must be kept chilled.
- Refrigeration: Store in an airtight container for up to 5 days. They actually taste better on day two once the flavors have had time to fully meld.
- Freezing: These bars freeze exceptionally well. Wrap individual squares in plastic wrap and place them in a freezer bag for up to 3 months. Thaw in the fridge for a few hours before eating.
- Serving Temperature: While they should be stored in the fridge, letting them sit at room temperature for 15 minutes before serving allows the brownie base to soften slightly for the best texture.
Serving Suggestions
- The Sundae Style: Serve a warm (or room temp) bar with a scoop of vanilla bean ice cream and a drizzle of salted caramel sauce.
- Afternoon Tea: Cut the bars into small, bite-sized 1-inch squares and serve them alongside a pot of Earl Grey or a dark roast coffee.3
- Holiday Platter: The black-and-white marbled look is naturally festive. Pair them with red strawberries or mint leaves for a beautiful dessert display.
FAQ
Can I use a box brownie mix?
Yes, you can. Prepare the box mix as directed on the package, but reduce the water or oil slightly to ensure the batter is thick enough to support the cheesecake swirl.
Why did my cheesecake layer crack?
Cracking is usually caused by over-beating the eggs into the cream cheese or over-baking the bars. Ensure your ingredients are at room temperature so they incorporate easily without needing excessive mixing.
Can I make this in a larger pan?
If you want to use a 9×13 pan, you should double both the brownie and cheesecake portions of the recipe. The baking time will remain roughly the same, but start checking for doneness around the 25-minute mark.
Why is my brownie layer oily?
This happens if the butter was too hot when you added the sugar and eggs. Let the melted butter cool until it’s just warm to the touch before starting your batter.
Conclusion
The Brownie Cheesecake bar is the ultimate “best of both worlds” dessert. It’s sophisticated enough for an adult dinner party but has the pure, chocolatey indulgence that kids adore. By following the simple marbling technique, you create a treat that is as visually stunning as it is delicious. It’s a reliable, impressive recipe that you’ll find yourself returning to whenever you need a “wow” factor with minimal stress.