Follow Me On Social Media!
No-Bake Banana Pudding Cheesecake: A Creamy, Chill-Set Dessert.
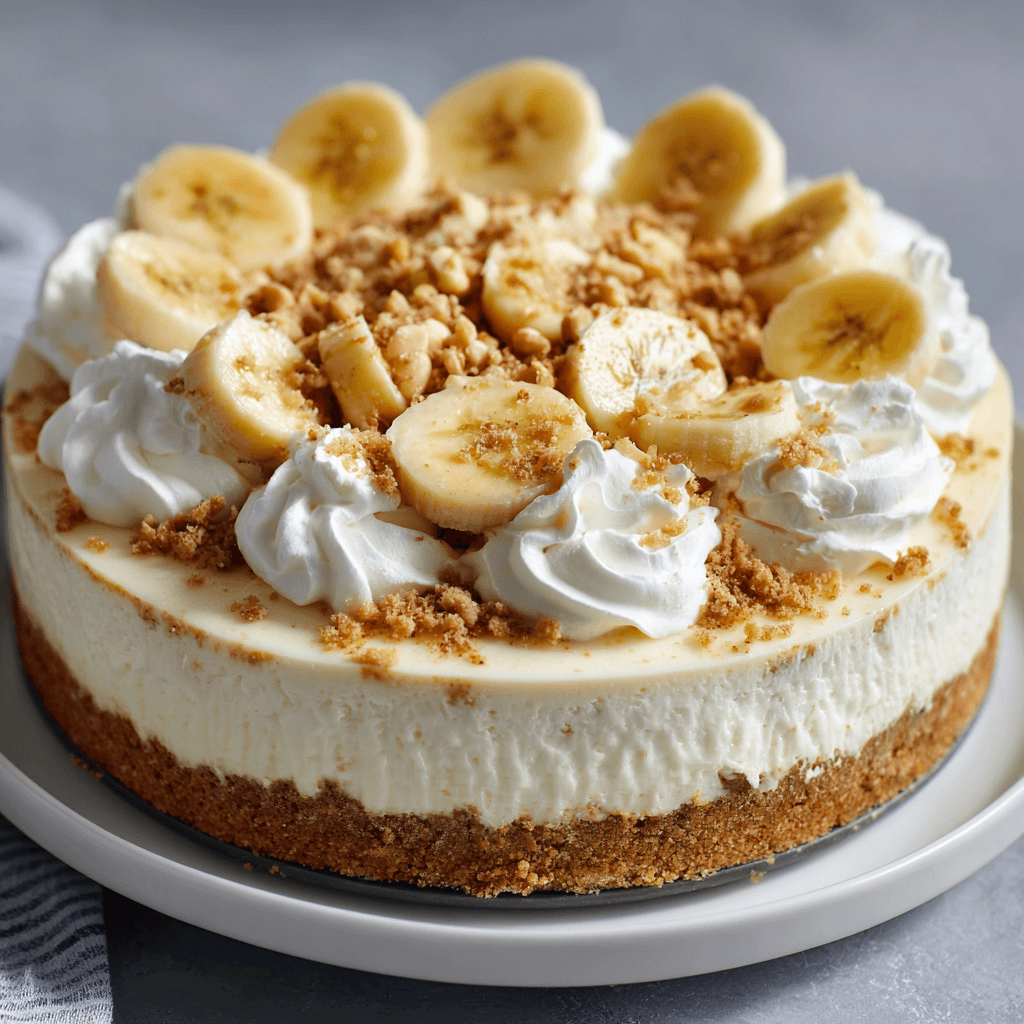
There’s something about banana pudding that brings back memories—maybe it’s the soft vanilla wafers, the sweet banana slices, or that cool, creamy filling. Now imagine taking all those comforting flavors and turning them into a cheesecake that doesn’t require an oven. This no-bake banana pudding cheesecake combines the best of both worlds: the rich, tangy smoothness of cheesecake with the nostalgic taste of classic banana pudding. It’s a dessert that looks impressive but comes together with minimal effort, making it perfect for summer gatherings, potlucks, or when you just want something sweet without heating up the kitchen.
The beauty of this recipe lies in its simplicity. You’re working with a vanilla wafer crust, a cream cheese base flavored with banana pudding mix, fresh banana slices, and a whipped topping that makes everything light and airy. The texture is smooth and creamy, with little bursts of banana flavor throughout. Because it sets in the refrigerator rather than baking in the oven, you can prepare it ahead of time and let it chill while you take care of other things. The result is a dessert that tastes like you spent hours on it, even though the actual hands-on time is around 20 minutes.
Ingredients
For the crust:
- 2 cups vanilla wafer cookies, finely crushed (about 60 cookies)
- 5 tablespoons unsalted butter, melted
- 2 tablespoons granulated sugar
For the filling:
- 16 ounces cream cheese, softened to room temperature
- 1 cup powdered sugar
- 1 package (3.4 ounces) instant banana pudding mix
- 2 cups heavy whipping cream, cold
- 1 teaspoon vanilla extract
- 3 medium ripe bananas, sliced
For topping:
- 1 cup heavy whipping cream, cold
- 2 tablespoons powdered sugar
- Additional vanilla wafers for garnish
- Banana slices for garnish (tossed in lemon juice to prevent browning)
Instructions
Start by preparing your springform pan. A 9-inch pan works best for this recipe. You can line the bottom with parchment paper if you want extra insurance against sticking, though it’s not strictly necessary.
For the crust, place your vanilla wafers in a food processor and pulse until they’re fine crumbs. If you don’t have a food processor, put them in a sealed plastic bag and crush them with a rolling pin. The crumbs should be fairly uniform, with no large pieces remaining. Transfer the crumbs to a medium bowl and stir in the melted butter and sugar until everything is evenly moistened. The mixture should hold together when you squeeze it in your hand. Press this mixture firmly into the bottom of your prepared pan, using the bottom of a measuring cup or glass to pack it down evenly. The crust should come up the sides slightly, about half an inch. Place the pan in the refrigerator while you make the filling.
For the filling, beat the softened cream cheese in a large bowl using an electric mixer on medium speed until it’s completely smooth and fluffy, about 2 minutes. Make sure there are no lumps. Add the powdered sugar and banana pudding mix, then beat again until well combined, scraping down the sides of the bowl as needed. This should take another minute or so.
In a separate bowl, whip the cold heavy cream with the vanilla extract until stiff peaks form. This usually takes about 3 to 4 minutes with an electric mixer on medium-high speed. You’ll know it’s ready when the cream holds its shape and doesn’t slide around when you tilt the bowl. Gently fold about one-third of the whipped cream into the cream cheese mixture to lighten it. Use a rubber spatula and fold from the bottom up, being careful not to deflate the cream too much. Once that’s incorporated, fold in the remaining whipped cream until no streaks remain. The filling should be light, airy, and smooth.
Remove the crust from the refrigerator. Arrange half of the banana slices over the crust in a single layer. Spread half of the cream cheese filling over the bananas, smoothing it gently with an offset spatula. Add another layer of banana slices, then spread the remaining filling over the top. Smooth the surface as evenly as possible. Cover the pan with plastic wrap, making sure it doesn’t touch the surface of the cheesecake, and refrigerate for at least 6 hours, though overnight is even better. The cheesecake needs this time to firm up properly.
When you’re ready to serve, make the whipped cream topping by beating the cold heavy cream with the powdered sugar until soft peaks form. Spread or pipe this over the top of the chilled cheesecake. Garnish with additional vanilla wafers arranged around the edge and fresh banana slices in the center. If you’re not serving immediately, wait to add the banana slices until just before serving, or toss them in a bit of lemon juice to keep them from browning.
Flavor & Texture Notes
The first thing you’ll notice when you take a bite is the contrast between the slightly crunchy vanilla wafer crust and the ultra-smooth filling. The crust has a buttery, cookie-like quality that’s not too sweet, which balances well with the rich cream cheese layer above it. The filling itself is creamy and light, with a distinct banana pudding flavor that’s sweet but not cloying. The instant pudding mix adds a certain nostalgic taste that’s familiar and comforting, while the cream cheese brings a slight tanginess that keeps everything from feeling too one-note.
The fresh banana slices add little pockets of soft fruit throughout, giving you a burst of natural sweetness and a different texture every few bites. The whipped cream topping adds an extra layer of airiness and makes the dessert feel more finished and elegant. Overall, the texture is somewhere between a traditional cheesecake and a mousse—creamy and dense enough to feel substantial, but light enough that you can easily have a generous slice without feeling weighed down.
Tips & Variations
Make sure your cream cheese is truly softened before you start. Cold cream cheese will create lumps that are difficult to smooth out, even with vigorous mixing. Let it sit at room temperature for at least an hour, or microwave it in short 10-second bursts if you’re in a hurry.
If you want a stronger banana flavor, you can mash one ripe banana and fold it into the filling along with the sliced bananas. Just be aware that this will add more moisture, so the cheesecake might take a bit longer to set.
For a different twist, try adding a layer of caramel or chocolate sauce between the banana slices. Dulce de leche works particularly well and adds a caramelized sweetness that complements the banana pudding flavor beautifully.
If you’re making this for someone who prefers less sweetness, reduce the powdered sugar in the filling to three-quarters of a cup. The pudding mix already contains sugar, so you can definitely dial it back without losing flavor.
For a gluten-free version, use gluten-free vanilla wafers for the crust. The rest of the ingredients are naturally gluten-free, though always check your pudding mix label to be certain.
You can also make individual servings in small jars or cups. Just layer the crushed crust, filling, and bananas in clear containers for a pretty presentation that’s easy to serve at parties.
Storage & Make-Ahead
This cheesecake actually benefits from being made ahead. It needs at least 6 hours to set properly, so plan accordingly. Overnight is ideal because it gives the flavors time to meld together and the texture becomes firmer and more sliceable.
Store the cheesecake covered in the refrigerator for up to 3 days. After that, the bananas may start to brown and soften, and the crust can become slightly soggy from the moisture in the filling. If you want to keep it longer, consider adding the banana slices only to the portion you plan to serve that day, keeping the rest plain.
This cheesecake doesn’t freeze particularly well because of the fresh bananas and whipped cream, which can become watery when thawed. If you must freeze it, do so without the banana slices and fresh whipped topping, adding those after it’s thawed in the refrigerator overnight.
When transporting this dessert, keep it chilled. If you’re bringing it to a party, transport it in the springform pan with the ring still attached for extra stability, then remove the ring just before serving.
Serving Suggestions
This cheesecake is rich, so slicing it into 12 pieces is reasonable, though you could stretch it to 14 if you’re serving it alongside other desserts. Use a sharp knife dipped in hot water and wiped clean between each slice for neat, clean cuts.
Serve it on its own, or alongside a cup of coffee for an afternoon treat. The flavor also pairs beautifully with a scoop of vanilla ice cream, though the cheesecake itself is already quite creamy, so this is really for serious dessert lovers.
For a more elegant presentation at dinner parties, drizzle each slice with caramel sauce or chocolate ganache just before serving. A sprinkle of crushed vanilla wafers on top adds extra crunch and makes each plate look more finished.
If you’re serving this at a casual gathering, set out some extra sliced bananas, whipped cream, and vanilla wafers so guests can add their own toppings. It becomes more interactive and fun, especially for kids.
FAQ
Can I use a different pudding flavor? Yes, vanilla pudding works well if you want a milder flavor, or you could try cheesecake-flavored pudding mix for extra richness. Coconut cream pudding would also be interesting if you like that tropical combination with banana.
Why is my cheesecake filling runny? This usually happens if the cream cheese wasn’t fully softened, if the whipped cream was under-whipped, or if the cheesecake hasn’t chilled long enough. Make sure your heavy cream reaches stiff peaks before folding it in, and give the cheesecake a full 6 hours minimum in the refrigerator.
Can I make this without a springform pan? You can use a regular pie dish or a 9×9-inch square pan. Just keep in mind that you won’t be able to remove the cheesecake from the pan, so you’ll need to serve it directly from the dish. Line it with parchment paper for easier slicing if you’re using a square pan.
How do I keep the bananas from turning brown? Toss the banana slices in a little lemon juice or pineapple juice before adding them to the cheesecake. The acid slows down the browning process. You can also wait to add the top layer of banana garnish until just before serving.
Can I use low-fat cream cheese or whipped topping instead of heavy cream? You can, but the texture won’t be quite as rich and creamy. Low-fat cream cheese tends to be a bit softer and less stable, and store-bought whipped topping has a different texture than freshly whipped cream. If you’re looking to lighten it up, using reduced-fat cream cheese is a better compromise than swapping out the heavy cream.
Conclusion
This no-bake banana pudding cheesecake is one of those recipes that feels like a warm hug in dessert form. It’s familiar, comforting, and just different enough from traditional banana pudding to feel special. The best part is how forgiving it is—there’s no worrying about overbaking, cracking, or whether your oven temperature is accurate. You simply mix, layer, chill, and enjoy. Whether you’re making it for a family dinner, a potluck, or just because you’re craving something sweet and creamy, this cheesecake delivers every time. Give it a try, and don’t be surprised if it becomes your new go-to dessert for any occasion.