Follow Me On Social Media!
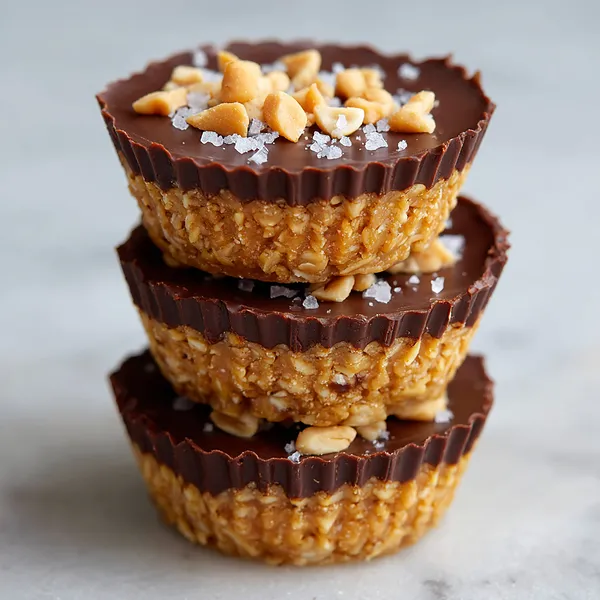
Peanut Butter Oat Cups
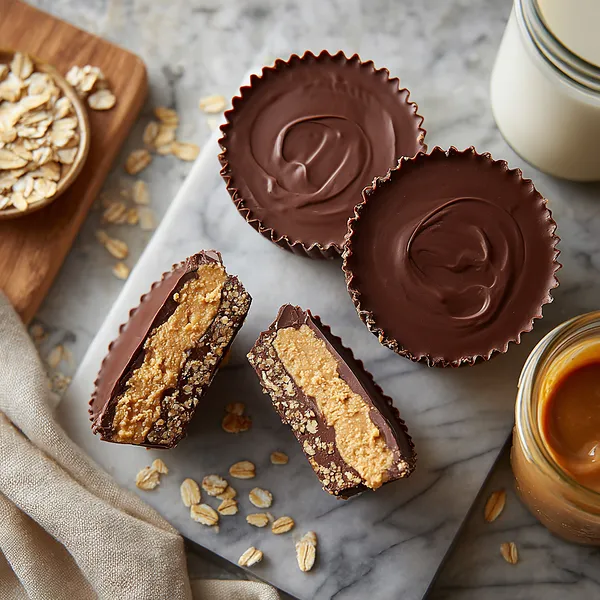
These Peanut Butter Oat Cups are simple, no-bake treats built on smart layering and balanced textures. A chewy oat and peanut butter base provides structure, while a smooth dark chocolate topping adds richness and contrast. The result is a satisfying, freezer-friendly snack that feels indulgent yet remains nutritionally mindful.
Why You’ll Love This Recipe
- No-Bake Convenience – Requires no oven time, making it ideal for quick prep and warm kitchens.
- Balanced Sweetness – Uses honey or maple syrup for natural sweetness without overpowering the nutty base.
- Texture Contrast – Combines chewy oats, creamy peanut butter, and snappy chocolate for a well-rounded bite.
- Freezer-Friendly – Stores exceptionally well, allowing you to make a batch ahead and enjoy as needed.
- Customizable – Easily adaptable with different nut butters, chocolates, or toppings.
- Nutrient-Dense Treat – Provides fiber, healthy fats, and sustained energy compared to traditional desserts.
Ingredients You’ll Need
Oat & Peanut Butter Base
- 1 cup rolled oats – Provides structure, chew, and fiber to form the base.
- ½ cup creamy peanut butter – Acts as the binding fat and primary flavor component.
- ¼ cup honey or maple syrup – Adds sweetness and moisture while helping the mixture stick together.
Chocolate Topping
- 1 cup dark chocolate chips – Creates a rich, firm topping with a slight bitterness to balance sweetness.
- 1 tablespoon coconut oil – Improves chocolate fluidity and ensures a smooth, glossy set.
Optional Toppings
- Sea salt flakes (to taste) – Enhances flavor contrast and reduces perceived sweetness.
- 2 tablespoons crushed peanuts (optional) – Adds crunch and reinforces the nutty profile.

Step-by-Step Instructions
- Prepare the Muffin Tin – Line a 12-cup muffin tin with paper liners or lightly grease with coconut oil to prevent sticking.
- Mix the Base – In a medium bowl, combine oats, peanut butter, and honey, stirring until fully cohesive and slightly sticky.
- Form the Base Layer – Divide the mixture evenly among the muffin cups and press firmly to create a compact, even base.
- Chill the Base – Place the muffin tin in the freezer for 10–15 minutes to help the base firm up before topping.
- Melt the Chocolate – Gently melt the chocolate chips with coconut oil in 30-second microwave intervals or using a double boiler until smooth.
- Add the Chocolate Layer – Spoon melted chocolate over each base, tapping the pan lightly to smooth and release air bubbles.
- Finish & Set – Sprinkle toppings while chocolate is still wet, then freeze for at least 30 minutes until fully set.
Recipe Notes & Tips
- Base Consistency – If the mixture feels dry, add honey or peanut butter in small increments to avoid crumbling.
- Pressing Technique – Firm compression is key to prevent the base from separating after chilling.
- Chocolate Temperature – Avoid overheating chocolate to prevent grainy texture or separation.
- Natural Peanut Butter – Stir thoroughly before measuring to ensure proper fat distribution.
- Serving Texture – Let cups sit at room temperature 5–10 minutes for optimal bite and flavor release.
Nutritional Information
- Prep Time: 15 minutes
- Chilling Time: 30 minutes
- Total Time: 45 minutes
- Servings: 12 cups (snack-sized portions)
- Calories: ~180–200 per serving (estimated; varies by ingredients used)
Perfect Pairings
- Fresh Berries – Adds brightness and acidity to balance richness.
- Greek Yogurt – Complements with protein and creaminess.
- Cold Brew Coffee – Enhances the chocolate notes without added sweetness.
- Herbal Tea – A light pairing that keeps the snack feeling balanced.
Ideal Occasions
- Meal Prep Snacks – Convenient grab-and-go option for busy days.
- Post-Workout Treat – Offers carbs and fats for recovery energy.
- Healthy Dessert Alternative – Satisfies sweet cravings without heavy baking.
- Casual Entertaining – Easy to serve and universally appealing.
Storage & Serving Tips
- Freezer Storage – Store in an airtight container for up to 3 months.
- Refrigerator Storage – Keeps well for up to 2 weeks when chilled.
- Layer Protection – Separate layers with parchment to avoid sticking.
- Best Serving Temperature – Slightly softened for improved texture and flavor.
Creative Variations to Try
- Almond Butter Cups – Swap peanut butter for almond butter for a milder nut flavor.
- Milk Chocolate Version – Use milk chocolate for a sweeter, creamier topping.
- Seed Butter Option – Sunflower seed butter works well for nut-free needs.
- Spiced Base – Add cinnamon or vanilla extract to the oat mixture for warmth.
Troubleshooting Common Issues
- Base Crumbling – Increase binder (honey or peanut butter) slightly and press more firmly.
- Chocolate Cracking – Allow cups to temper slightly before biting.
- Overly Hard Texture – Reduce freezer time or add more coconut oil to chocolate.
- Greasy Mouthfeel – Use high-quality chocolate with proper cocoa butter balance.
Why This Recipe Works
This recipe relies on fat-based binding rather than heat to create structure. Peanut butter and honey coat the oats, allowing them to firm up when chilled, while coconut oil lowers the melting point of chocolate for a clean bite straight from the freezer. The balance of fiber, fats, and moderate natural sugars delivers satiety without excess calories, making each portion both functional and indulgent.
Final Thoughts
Peanut Butter Oat Cups are a practical example of how thoughtful ingredient pairing and simple techniques can produce a polished result. They offer a nutrient-conscious alternative to baked desserts while remaining deeply satisfying. With easy substitutions and controlled portions, they fit seamlessly into both everyday snacking and lighter dessert rotations.