Follow Me On Social Media!
Raspberry Crumble Bars: A Perfect Balance of Tart and Sweet.
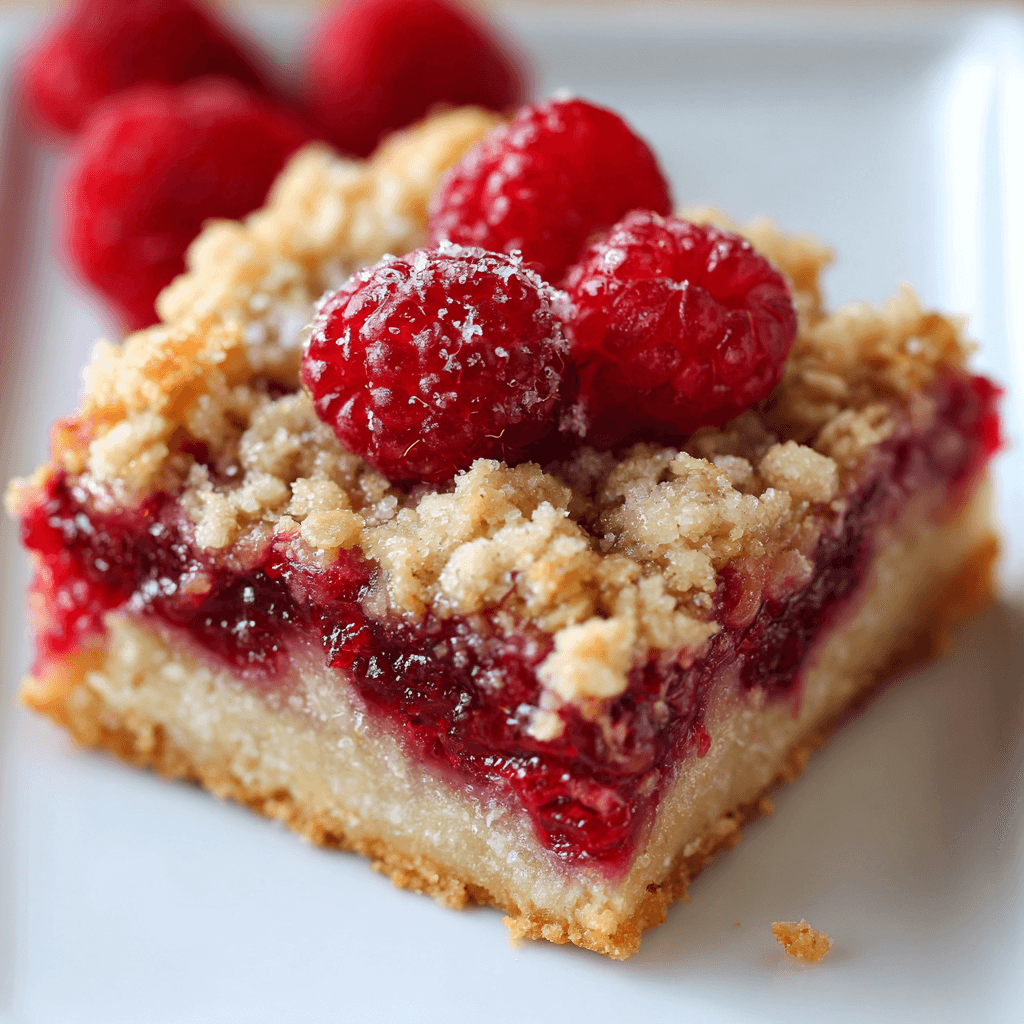
Raspberry Crumble Bars are a versatile treat that functions as a portable version of a classic fruit crisp.1 This recipe features a buttery, shortbread-style crust that pulls double duty as the crunchy crumble topping.2 The center is filled with a vibrant raspberry jam or fresh fruit layer that thickens during baking into a chewy, tart preserve.3+2
The beauty of these bars is their simplicity; you use one dough for both the base and the top, significantly reducing prep time while ensuring a consistent flavor throughout.
Ingredients
The Crust and Crumble
- All-Purpose Flour: 250g.
- Old-Fashioned Rolled Oats: 90g (adds texture and nuttiness).4
- Unsalted Butter: 225g (1 cup), cold and cubed.
- Granulated Sugar: 150g.
- Light Brown Sugar: 50g.
- Baking Powder: 1 teaspoon.
- Salt: 1/2 teaspoon.
- Vanilla Extract: 1 teaspoon.5
The Raspberry Filling
- Fresh Raspberries: 300g (or high-quality raspberry preserves).
- Granulated Sugar: 2 tablespoons (omit if using preserves).
- Lemon Juice: 1 tablespoon.
- Cornstarch: 2 teaspoons (to thicken the fruit juices).
Instructions
Step 1: Prep the Pan
Preheat your oven to 180°C (350°F). Grease a 9-inch square baking pan and line it with parchment paper, leaving an overhang on two sides to easily lift the bars out later.
Step 2: Make the Dough
In a large bowl, whisk together the flour, oats, sugars, baking powder, and salt. Add the cold, cubed butter. Use a pastry cutter or your fingers to work the butter into the dry ingredients until the mixture resembles coarse crumbs with some pea-sized chunks of butter remaining. Stir in the vanilla.
Step 3: Press the Base
Reserve about 1.5 cups of the crumble mixture for the topping. Press the remaining mixture firmly into the bottom of the prepared pan to create an even, solid crust.
Step 4: Add the Filling
If using fresh berries, toss them with the sugar, lemon juice, and cornstarch in a small bowl. Spread the berries (or the preserves) evenly over the crust, leaving a tiny border at the edges to prevent the fruit from sticking to the pan.
Step 5: The Crumble Top
Sprinkle the reserved crumble mixture over the raspberry layer. Do not press it down; let it sit loosely to create a craggy, textured surface.
Step 6: Bake and Cool
Bake for 35–40 minutes until the top is golden brown and the raspberry filling is bubbling. Crucial: Allow the bars to cool completely in the pan for at least 2 hours before slicing. The filling needs this time to set, or the bars will fall apart.
Flavor and Texture Notes
These bars offer a buttery, salty-sweet profile. The crust is sturdy and short, while the oat-heavy crumble adds a satisfying crunch. The raspberries provide a sharp, acidic brightness that cuts through the richness of the butter, creating a balanced bite that isn’t cloyingly sweet.
Tips for Success
- Cold Butter is Mandatory: Using cold butter ensures that the crust stays flaky and the crumble doesn’t melt into a flat sheet during baking.
- Oat Selection: Use rolled oats (old-fashioned) rather than instant or quick oats. Rolled oats hold their shape better and provide a superior “crumble” texture.
- Clean Slices: For the cleanest edges, refrigerate the bars for 1 hour after they have reached room temperature before cutting them with a sharp knife.
FAQ
| Question | Answer |
| Can I use frozen raspberries? | Yes, but do not thaw them first. Toss them in an extra teaspoon of cornstarch to account for the extra moisture. |
| Can I use other fruits? | Absolutely. This template works perfectly with blackberries, blueberries, or even chopped peaches. |
| How do I store them? | Store in an airtight container at room temperature for up to 3 days or in the fridge for 1 week. |
Conclusion
Raspberry Crumble Bars are a reliable, crowd-pleasing bake that feels equally at home at a summer picnic or as an elegant afternoon tea accompaniment. The contrast between the golden oats and the ruby-red fruit makes them as visually appealing as they are delicious.